Friday, July 29, 2011

Best Witches

I had an idea last September (2010)...the time of year when I start to get a little...passionate...about my decorating.  I decided that it would be fun to change up all the frames of kids/family/etc that I have hanging on the wall and make them Halloweeny pictures of my, uh... kids/family/etc!

So the kids donned their Halloween attire a little early to take a few pictures.
And amazingly, these pictures were taken pre-DSLR.  Not too shabby of pictures for an old point and shoot.

So without further ado:

Halloween 2010

For the 4x6 frames of my kids hanging from the living room mirror:
(um...the frames are hanging...not my children):

Cowboy/Sheriff:

Darling Witch:

Mischievous Witch:

We opted for black and white to make them a little more...spooky.


For the 5x7 frames (usually featuring pictures of all three children together) sitting on the shelves by our front door:

 (I know this one only has two of the kids, but I just thought it was so precious.  
Plus, they fit right in with all my witch decor...)

(I may be weird, but I love random pictures of my children more than posed ones.  
They make me smile.  This one is no exception!)


For the two 8x10 frames in the hallway:


(I feel (sorta) bad for singling out daughter #1 with those ones, but she gave me some amazing random "poetic" poses and I just couldn't resist.  I also have a thing for witches...)

 So there ya have it!  
What better way to decorate for Halloween then to make my children the subject of my decorations!  

 It looked amazing (if I do say so myself) and I can't wait to do this again this coming year.  Hmmm...maybe I should go dig out the Halloween costumes box and get started early...

Best Witches!

Thursday, July 28, 2011

Haunted Mansion

Back in February my husband and I needed a get-away-from-the-stresses-of-life vacation, and headed to Disneyland (our last time without the kids).  I had just bought my first DSLR, and decided that I would bring along my tripod and see if I could get a few good pictures of the Haunted Mansion to hang up for Halloween.  

Here is the original shot that I took:

BEFORE
Yeah I know...pretty bad.  It was so dark, and believe me when I say I was lucky to get a shot without people in it!

It definitely needed some help in order to be frame-able.  In March I finished my first edit of this picture...and boy I'm new at this photoshop stuff, so it took a VERY long time!  I had good intentions to edit it again to see if I could get a different look that I liked better, but I never could work up the energy...so this will have to do for this year.

 AFTER
 This haunted mansion picture will reside in a 16x20 frame above my "testing" ledge.  
I would prefer it didn't reside in anyone else's home for now, so please DO NOT COPY.

I especially thought the super-imposed moon and fog were nice touches.  :)


Here are two other photos that will be hung up in various places around the house:


This one is a bit on the blurry side, so it will have to be a small 4x6.

 I admit I am itching to go back to Disneyland now that I know a few more things about my DSLR.  But for now these pictures will suffice.  :)
 

Wednesday, July 27, 2011

Halloween in July

I walked into the Dollar Tree today and what did I see? Christmas Halloween in July!  I kid you not, they actually had a small section of Halloween decorations up already (amidst all the back to school gear and leftover luau decor).  Even being the Year-Round-Halloween-Shopper-Fanatic that I am, I still think that July is a BIT early to be seeing it in stores.  But I am not one to turn up my nose to such a golden opportunity!  

I was hoping beyond hope that they would have black ravens like they did last year.  After much searching...I finally found them in a hidden bin in a middle aisle display.  I remembered crying (that may or may not be literal) that I only bought ONE last year, and regretted not having bought more because they sold out so fast.  

So today I bought 11.


And of course I had to test one out on the testing ledge.
That will do.


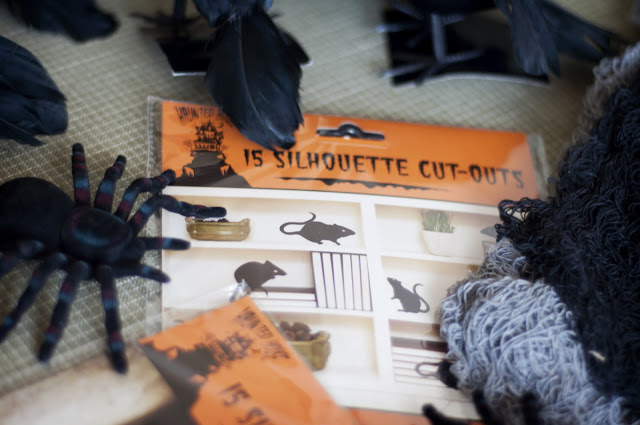
They also had a package of 15 rat silhouettes (for a dollar, of course)...which saves me a lot of time having to cut out my own the Martha way (link here). 

  I also bought the raven ones, just for good measure.

And although as a general rule I hate decorating with spiders...because I just don't like them...my kids conned me in to getting a few.  (bless their little Halloween-loving hearts) Add to that a few packages of spooky cloth (similar to cheesecloth) and I was set!  

Of course, daughter #1 had to test out the cloth to see if it was spooky enough.

What do you think?  Pretty spooky to me!


Daughter #2 thought we were playing dress-up and joined in on the fun.


All in all, quite the Halloween horde...especially for the dead of summer!


I will have to be sure and stop by again sometime soon to see what else they put out, because I'm sure they are just getting started.

Here's to Halloween in July!


Tuesday, July 26, 2011

Homely to Haunted {take 1}

Two words:  Deseret Industries.  

I LOVE that place.  

I'm almost embarrassed to say that the first place I make a beeline for is the knick-knack aisle.  You know...the aisle with all the random pieces of...stuff...that did not have a home in any other section of the store.  Believe it or not, this is the best place to find what I call little treasures.   Some days I will dejectedly come home from DI with nothing; other days I will feel like a pirate with a hoard such as this:

(Don't panic...this pile cost me less than $18.  Not too shabby if I do say so myself.  And I guarantee you will see most, if not all, of these beauties in future episodes of "Homely to Haunted")

But I digress.

The purpose of this and future "Homely to Haunted" posts is to feature the transformation of little homely treasures into valuable Halloween decor.   

Our first victims are four of these candlesticks found at the aforementioned hoarder's heaven:


They were just screaming to reach their full potential!
As lovely as the whole "Grecian urn" kind of decorating is, they were destined to become something greater.

And so I gave them a little help...and turned them into these.


Wa-la! Worthy of a place of honor in any haunted mansion (most particularly...mine).

I found many a tutorial in blogland that uses the technique of brushing paint onto the surface of an item and then wiping off the excess to get the desired effect.  Using a paint brush to apply black paint (and get into those tiny nooks and crannies) is ideal...but when you find there is not a paint brush to be found (ahem), you can just use a paper towel.  Wipe off with an old towel or rag to get those great little scratches.

It is a bit messy, but actually quite satisfying.  Good thing acrylic paint washes off your hands easily.


And then of course I had to test it out on the shelf on which it will reside during haunting season. 


And squint my eyes and imagine what it will look like with all the other Halloween decor around it...

...I can almost see it...


And the transformation is finished.

Three pretty maids all in a row.


So do me proud, and don't pass up those little homely treasures!


Related Posts Plugin for WordPress, Blogger...