Tuesday, September 18, 2012

Witch Silhouettes {free printables}

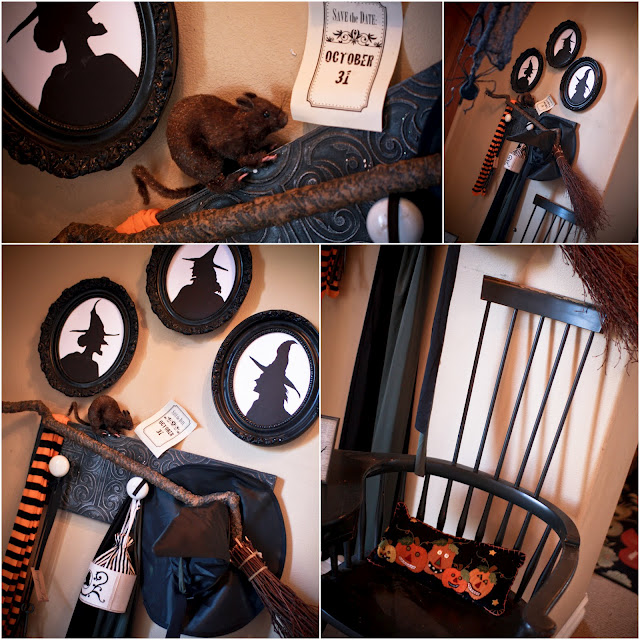
  I finally completed one of my favorite projects for this year...my witch silhouette wall!


  If you ask me, Halloween decor isn't complete without a few ladies in black!


I had a lot of inspiration for this project.  The first one came from Out of the Attic.  She is another witch lover like me, and I have gotten a ton of ideas from her decorations.  She had these lovely witches above her coat hooks that I just loved:


My other inspiration came from a shop on Etsy.  She had the most darling witch silhoette for sale:


At first I wanted to just copy her silhouette directly because it was so darn cute, but I decided to just use it purely as inspiration and make my silhouettes completely my own.  That way I could feel a little better about sharing my drawings. Yes, I'm going to share!  You can find the PDF's to download at the end of this post.

So to start my project, I printed out my scanned picture of my witches.  I used the darling Nessarose as my example (each of my silhouettes has a name).  There are many different mediums you can use to create silhouettes, but I chose the paper route.


 I cut out her out and traced her with a pencil on black paper.  I found it helpful to use a little bit of adhesive or tape to keep the stencil from moving around too much.


 Then I cut out Nessarose in black, and used my spooky damask paper and white oval from last year.  Isn't she a beauty?


And then of course I repeated the process for her sisters. I love how they turned out!


Time to make your own!  Feel free to print these out and see what you can do.


Sorry Zelda.  I didn't fit you into the decor this year, but since I had a baby in April there will be another frame up here for you in time for next year.  :)


Thursday, September 13, 2012

Witch Sign {part 1}

Have you ever seen THIS sign post from Better Homes and Gardens floating around the web? It has been my dream to recreate this for several years now...and I think this is finally going to be the year that it happens!

Last year my dear Halloween friend (she gets mentioned a lot on this blog, doesn't she) taught me how to make fake wood signs out of insulation using the technique found HERE.  So we got that all cut out, etched in, and painted black...but then things got crazy and it didn't get finished.  With Halloween finally coming around again this year, I whipped the sign out and gave it the final gray dry brush layer for the top.


And here she is close up.  I, of course, did a witches inn, because I love witches.


If I could do this over again (which I might if I have way too much time on my hands one of these years) I would make the lettering a lot bigger so that it could be seen better from further away, but this will do for now.  I'll also need to re-do the "established" part so that it is a little darker.  

There are always vacancies at my hotel...mwa-ha-haaa.


There is obviously a lot that still needs to be done.  I need to find some sort of chain to hang these from, for starters.  I also need the actual sign post to hang it from.

I love how on the BHG website tutorial they say to just grab your trusty old sign post as part of the project.  Sorry, I'm fresh out of vintage sign posts.  So I guess I'll have to make my own.

This part ended up being a lot more expensive than I would have liked, but I really wanted the fancy scroll work and stuff, so I grabbed a landing newel from Home Depot to use as the main part of my sign post.


I also grabbed some 50% off iron work and another 2 inch square long "stick" for the cross beam.


It is yet to be seen if I can pull this off the way I imagine it in my head.  But that will have to be a project for another day.


Tuesday, September 11, 2012

Just in Case...

It is amazing how much Pinterest has transformed the world of crafts since last October.  I was actually a compulsive "bookmarker" (I seriously had billions of bookmarks on my toolbar split up into a hundred different categories), so it was a natural transition for me to switch to Pinterest.  The best part is that now I get to see what everyone else has been "bookmarking" too!

Early in the year I saw a pin for a clever little shadow box that said, "In case of Vampire Attack, Break Glass".  I saw this idea and knew I had to do it.  (link to tutorial here)

Funniest party about this project is that I pinned it, then my Halloween friend immediately pinned it too.  The VERY NEXT DAY (no joke), my friend showed up at my door with a whittle out stake (made out of an old broomstick, I believe) just for me.  When making her own she told her son to make two so that I could have one too (yes, this was back in March).  Oh how I love my fellow Halloween crazy friends!

With the hardest part already done, I really had no excuse to not finish the project that weekend.  The rest of the project was easy.  I grabbed a $5 12 x12 shadowbox from the Craft store, got a paint pen from Walmart (the finer the tip, the easier this project will be), and got to work.  You can print off the words from the link above, or you could easily use any font you want on your own. It only took me about 15 minutes to paint the lettering on. 

And here is the finished project:


I have a couple of ideas using this same technique that I hope I get around to doing this year...

And there you have it!  An easy half an hour project for you to do before Halloween sets in.

My Halloween board on Pinterest is here if you would like to follow!


Friday, September 7, 2012

A Little Dusty

It has been a long hibernation, but I'm happy to be back!

September 1st is the first day of decorating around here. Although my husband and kids all know it is just the START...and it will actually take a few weeks to get it all up.  A nice bout of sickness in our home on September 2nd stopped us dead in our tracks, so we are getting a slow start.  But I'm not too concerned. Although there is much to do, there is still plenty of time.

The first few days of unpacking Halloween are always spent making minor repairs from last years' mishaps.  Take my candelabra, for example.  After being toted around to three different Halloween parties last season, she kind of bit the dust.


But no worries.  My trusty glue gun will have her fit as a trivet in no time.

Such is the scene around here.  While we are clearing off the dust (just so we can put it back on), I have a few projects I have been working on that I am excited to show off.  Be sure to check back next week to see what they are!


Related Posts Plugin for WordPress, Blogger...